
Here is the situation I see over and over. Someone spends real money on an ergonomic chair, pulls it out of the box, adjusts the seat height so their feet touch the floor, and sits down. By 3pm their lower back is tight. Their shoulders are riding up toward their ears. They figure the chair is just not as good as the reviews said.
The chair is usually fine. The setup is not. An ergonomic chair with 3D lumbar, seat depth adjustment, and 4D armrests only works when those controls are actually used, in the right order, for the specific body sitting in it. I went through this process most recently on the HOLLUDLE ergonomic mesh chair, which has every adjustment this guide covers. This is the sequence that works.
Your back is telling you the chair is wrong. It is more likely that the setup is wrong.
The HOLLUDLE ergonomic mesh chair has 3D lumbar support, seat depth slide, height-adjustable and width-adjustable armrests, recline tension, and a headrest. Over 6,400 Amazon reviews. This guide is built around everything it can do.
Amazon Check Today's Price on Amazon →Step 1: Seat Height , Set It for Your Thighs, Not Just Your Feet
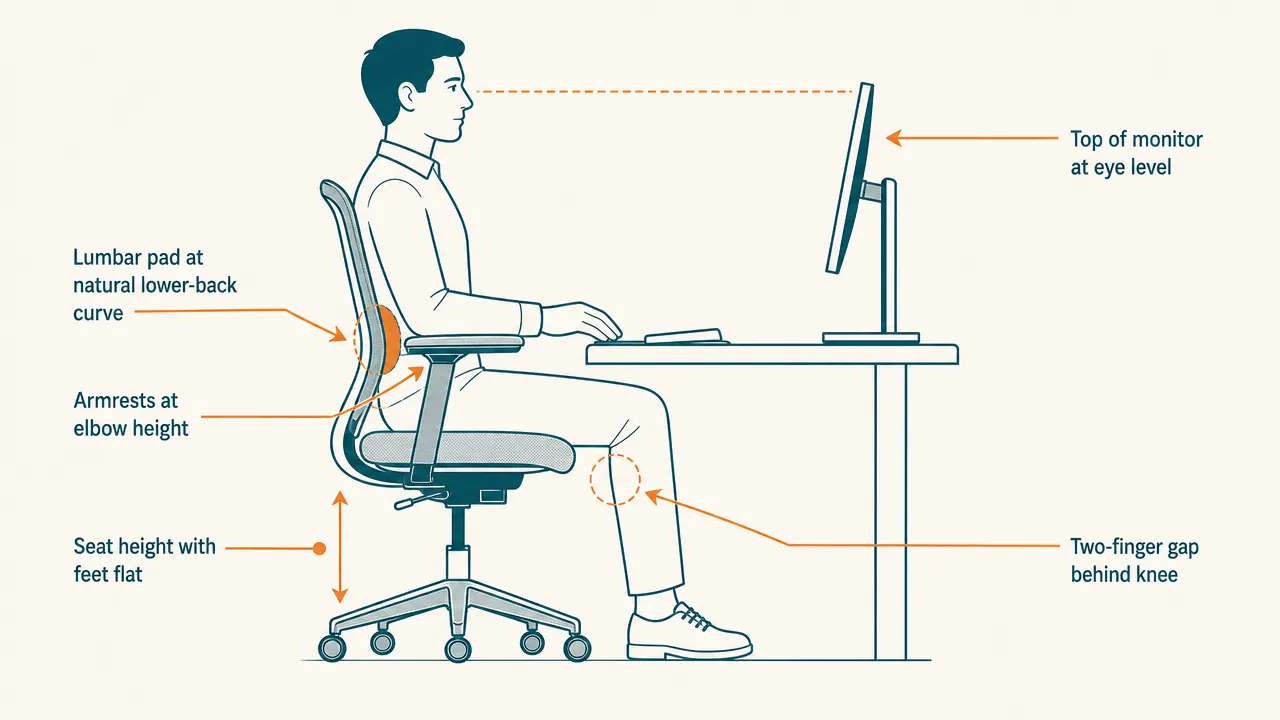
Seat height is the one adjustment everyone makes, but most people aim at the wrong target. The goal is not just feet flat on the floor. The goal is thighs parallel to the floor, or angled very slightly downward toward the knee, with feet flat. That is more specific than it sounds.
Sit all the way back in the seat and use the pneumatic lever, usually on the right underside, to find that position. When you get there, you should be able to slide two fingers under your thigh at the front edge of the seat with light resistance. No gap means the seat is too low and the front edge is pressing into your thighs. A large gap means the seat is too high and your feet are taking all the weight. On the HOLLUDLE the seat height range runs from about 17.5 to 21.5 inches, which works for most people between around 5'3" and 6'2" at a standard desk. If your desk height and correct chair height are in conflict, raise the desk or add a footrest, not the chair.
Do not move on to the next step until this one is locked in. Everything else is built on top of it.
Step 2: Seat Depth , Two Fingers Between the Seat Edge and the Back of Your Knee
Most chairs do not have seat depth adjustment, which is one reason so many of them feel wrong for people on either end of average leg length. On the HOLLUDLE, there is a lever under the front of the seat that slides the seat pan forward or back. Use it.
Sit all the way back so your lower back is against the backrest. Measure the gap between the front edge of the seat and the back of your knee. You want roughly two to three fingers of clearance. Less than that and the seat edge presses into the blood vessels behind the knee, which is why your legs go numb. More than that and your pelvis slides forward away from the backrest, leaving your lower back unsupported regardless of what the lumbar is doing. Getting seat depth right is a prerequisite for lumbar support actually reaching your spine.
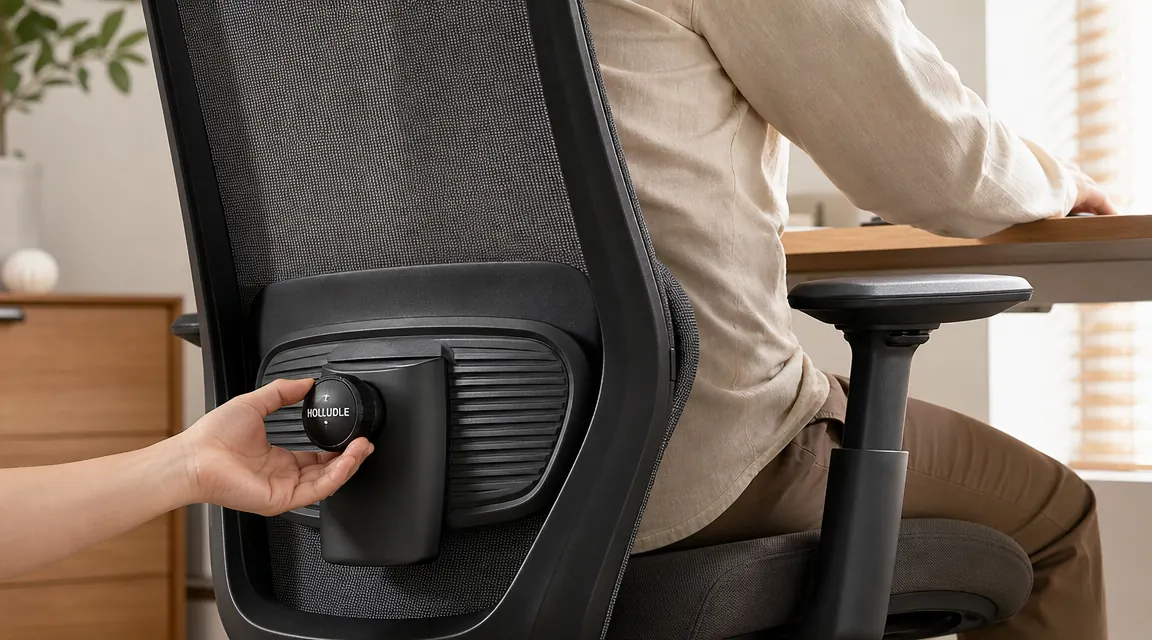
Step 3: Lumbar Height and Depth , Find the Natural Curve and Press Gently Into It
Your lumbar spine has a natural inward curve, roughly at belt height, just above the waist. The lumbar pad needs to sit there. Not an inch higher, not an inch lower. Higher and it pushes into your mid-back and causes upper back fatigue. Lower and it catches your tailbone and does nothing for the curve.
Start with lumbar height. Slide or adjust the back panel until the pad lands right at belt line when you are sitting fully back. Then, if your chair has lumbar depth like the HOLLUDLE does, start at the shallowest setting and push it forward one click at a time until you feel continuous gentle contact with your lower back. Supportive, not pushy. If it forces your upper body away from the backrest, back off one click. Stand up and sit back down twice and make sure the pad catches your lower back naturally each time.
Lumbar support only works when seat depth is set first. Get seat depth wrong and the lumbar pad is pressing into air no matter where you position it.
The reason lower back pain from sitting accumulates is that slumping lets the natural lumbar curve flatten, putting the load on the discs rather than the vertebrae and their supporting muscles. A properly placed lumbar pad keeps that curve in place passively, without you having to consciously sit up. You should be able to relax into the chair and still be in a good position.
Step 4: Armrest Height and Width , Shoulders Relaxed, Elbows at Keyboard Level
Armrests that are too high cause your shoulders to shrug slightly, all day, and by mid-afternoon your traps and the back of your neck are tight for no obvious reason. Armrests that are too low give your arms no support and you end up leaning sideways or holding your arms up on their own, which fatigues the shoulder muscles differently but still reliably.
Drop the armrests all the way down. Sit up straight and let your arms hang loose. Let your elbows bend to roughly 90 degrees. Raise the armrests to that exact position. Your shoulders should be completely relaxed, not elevated, not dropped. Your forearms should float just above or rest lightly on the pads when your hands are on the keyboard. If the armrests go up at all and your shoulders follow, they are already too high.
Width matters too. Arms that angle outward to reach pads that are set too wide put a subtle side-curve into your spine over hours. Arms pressed inward by pads that are too narrow rotate your shoulders forward and round your upper back. Set the width so your arms drop straight down from your shoulders to the pads, not angled in or out. On the HOLLUDLE the armrests adjust in four directions, which gives you more range here than most chairs at this price.

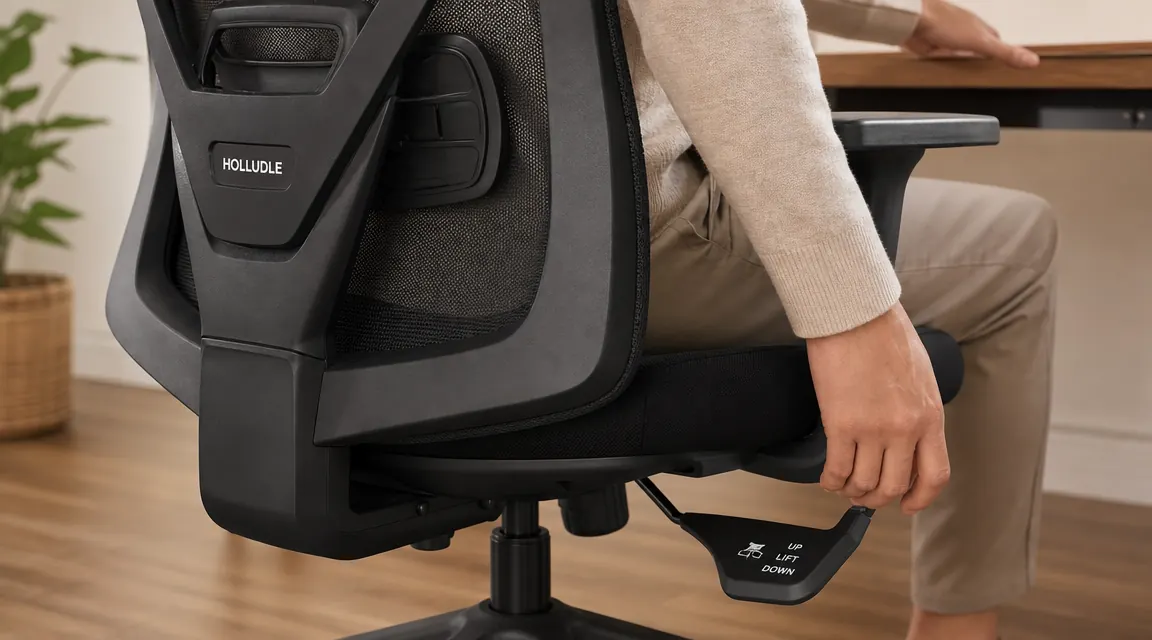
Step 5: Recline Tension , Active Sitting, Not a Locked Upright Position
Sitting at exactly 90 degrees upright all day is not actually the goal. Your hip flexors tighten, your lumbar discs take more vertical load, and you start fidgeting more because your body knows it needs to move. A slight recline, somewhere between 100 and 110 degrees, takes pressure off the discs and lets your back muscles relax without you losing your posture.
The tension knob under the seat controls how much resistance the recline has. Turn it clockwise to stiffen, counterclockwise to loosen. The right setting requires a small deliberate lean to begin the recline. You should not be able to casually rock backward, but you also should not have to strain. Tighten until you need clear intention to move, then loosen one half-turn. Leave the chair unlocked during work so your body can make small adjustments throughout the day. The recline lock is useful during calls or reading, not as a default position.
Step 6: Headrest Position , It Is for Reclining, Not for Working
This is where most people go wrong with headrests. They set the headrest so it is in contact with their head while they are typing upright. The headrest then pushes the chin slightly forward and down, which puts the neck into flexion for hours and causes the exact upper neck and base-of-skull tension it is supposed to prevent.
Set the headrest height so it is not touching your head when you sit upright working. It should make contact only when you recline to about 100 to 110 degrees during a thinking pause or a quick rest. Angle it slightly forward so it catches the back of your skull or the base of your head naturally when you lean back, without you having to search for it. On the HOLLUDLE, the headrest adjusts both height and tilt angle. Lower it until it is clearly out of contact when upright, then angle it forward just enough to meet your head when you recline.
Test it by doing focused typing work for ten minutes, then consciously check where your head is. If the headrest is touching you, it is too high or too far forward. Adjust and repeat.
What Else Helps
Chair adjustments handle the chair. The rest of the setup is on you.
Once the chair is dialed in, set your monitor height before adjusting anything else on the desk. Sit in your newly adjusted position, look straight ahead with your chin level. The top of the monitor should be at or slightly below your eye line. If the monitor is lower than that, you will nod your head downward all day, and no amount of lumbar or armrest tuning prevents that from becoming neck pain. A monitor arm fixes this better than any stand because you can dial in exact height and distance. Chair first, monitor second. The chain of adjustments flows down from your eye line.
Take a two-minute standing break every 45 to 60 minutes. No chair is a substitute for movement. The ergonomic setup keeps you comfortable while you are in the chair. Getting out of the chair periodically is the other half of the equation, and it costs nothing.
Revisit these settings in two or three weeks. The first time through you will get close, but your sense of what feels right sharpens after a few days in the chair. The lumbar position especially tends to need a second pass once you understand what correct support actually feels like versus what you were used to.
If you have worked through every step above and still feel consistent discomfort, the problem may not be the adjustments. It may be that the chair does not have enough range for your frame. Some chairs lack seat depth sliders entirely. Others have lumbar pads that only move up and down with no depth control. When a chair is missing two or three of these controls, you are trying to solve a six-variable problem with three dials. At that point the fix is not more adjustment. It is a chair that actually has the full range. The HOLLUDLE has it, which is why it is the reference for this guide. The long-term review covers how it holds up across months of daily use if you want more before committing.
A chair without full adjustment range cannot be tuned to fit you, no matter how carefully you try.
The HOLLUDLE ergonomic mesh chair has 3D lumbar, seat depth slide, 4D armrests, recline tension knob, and a height-and-tilt headrest. It is the chair this guide is built around, and it is currently in stock with over 6,400 reviews on Amazon.
Amazon Check Today's Price on Amazon →